By now, many of us are familiar with using REST APIs to accomplish network automation tasks. But some may have wondered what the effort involved in providing one.
A fun way to explore ‘the other side’ is to write a useful little chatbot to integrate with your collaboration tool of choice. This blog shows how to connect Slack with Cisco ACI using Python and FastAPI.
Since this demo uses the DevNet ACI sandbox and Slack lives in the Internet anyway, I decided to spin up an AWS Ubuntu EC2 instance to glue them together and pointed a subdomain to it (api.nwmichl.net). I don’t use Python virtual environment or containers to keep this piece as simple as possible. In fact, it would even be possible to deploy the Python script as an AWS Lambda function, but all this remains for the inclined reader to improve.
Hello World
Let’s start easy and take the first steps with FastAPI. It’s still a fairly young project, but offers some advantages that you will quickly learn to appreciate. Such as automatic documentation or pydantic-supported data models to ease validation and error handling. An Ubuntu 20.04 base image just needs three additional things to get started:
- The Python packet manager Pip (to install the following)
- The FastAPI framework
- Uvicorn, an async-capable Python web server
$ sudo apt install python3-pip
$ pip install fastapi
$ pip install uvicorn[standard]
A First HTTP GET /
Only few lines of Python in a file named main.py and the current user directory are enough to celebrate a first success.
from fastapi import FastAPI app = FastAPI() @app.get("/")
def root(): return {"message": "API Server seems to be up"}
app will be an instance of the FastAPI class and the decorator @app.get("/") is used to point an HTTP verb & URL path to the following Python function.
Next, you can start the server and use curl localhost:8000 to test locally (via a second ssh session because the uvicorn server blocks the screen in developer mode).
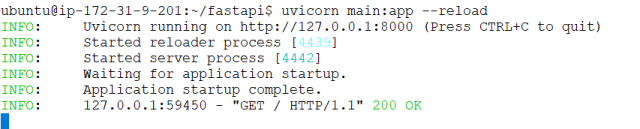
Uvicorn logs every API call to the screen and watches out for changes to the main.py file due to the -- reload option.
Remote Access
Now, to reach the API from the outside, we need to open the TCP Port 8000 in
- the AWS Security Group using the Management Console,
- the local iptables firewall of the EC2 instance using the UFW (Uncomplicated Firewall).
- And start the uvicorn server again with host 0.0.0.0 to allow external access.
$ sudo ufw allow 8000/tcp
$ sudo ufw allow ssh
$ sudo ufw enable
$ sudo ufw status
(...)
$ uvicorn main:app --host 0.0.0.0 --reload
At this point we should be able to reach the API with every WEB browser over the Internet using the URL http://api.nwmichl.net:8000, and get back the simple JSON response from our Python script.
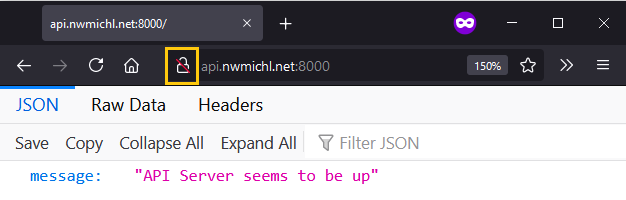
Great, mission accomplished! But …

This is all unencrypted http traffic over the Internet! Time to stop the uvicorn server with CTRL-C and think about a little Transport Layer Security (TLS) first.
TLS First
It’s common best practice to use a reverse proxy like Nginx with letsencrypt/certbot to terminate all https requests and route them to the http backend service. But I’ll use Caddy because it’s way simpler to handle (and fits well within the topic of this post, because it offers an API for config mgmt).
In preparation for the rollout of Caddy, the local firewall and AWS Security Group must be adapted to allow http and https traffic. TCP port 8000 is actually no longer necessary and should be closed.
$ sudo ufw allow http
$ sudo ufw allow https $ sudo ufw status numbered # to find the number of the 8000/tcp rule
$ sudo ufw delete <NUM>
Installation of Caddy for Ubuntu.
$ sudo apt install -y debian-keyring debian-archive-keyring apt-transport-https
$ curl -1sLf 'https://dl.cloudsmith.io/public/caddy/stable/gpg.key' | sudo apt-key add -
$ curl -1sLf 'https://dl.cloudsmith.io/public/caddy/stable/debian.deb.txt' | sudo tee /etc/apt/sources.list.d/caddy-stable.list
$ sudo apt update
$ sudo apt install caddy
Edit the complex caddyfile via sudo vi /etc/caddy/Caddyfile
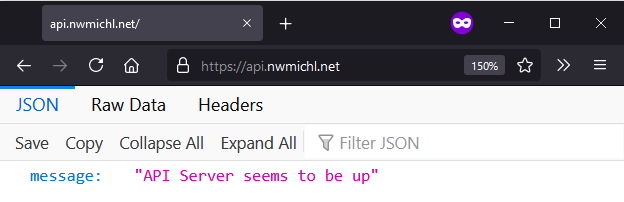
api.nwmichl.net { reverse_proxy localhost:8000
}
and start the reverse proxy via sudo systemctl start caddy, or sudo systemctl reload caddy if it has been started already. Caddy automagically obtains and renews TLS certificates via LetsEncrypt or ZeroSSL.
Slack App
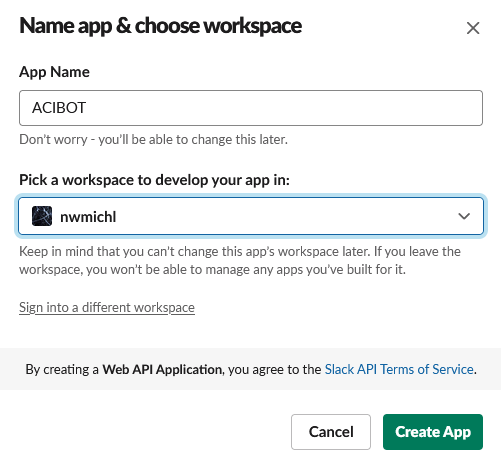
Next we need to create a Slack App in order to use custom slash commands in our workspace. Just login and hit https://api.slack.com/apps/ to open the Slack API App page. Select Create New App and From scratch to give it a name an associated a workspace.
At the next page, please copy the Verification Token and you might want to customize the display information as well.

Last but not least, we create a new slash command, to tell Slack when and where to send our bot requests.

Make It a Bot
Slack sends API requests triggered by a slash command as HTTP POST and form-urlencoded. Which means that all the request parameters, like additional text arguments and authentication token are simply appended to the URL, separated by &.
/aci help becomes POST https://api.nwmichl.net/acibot?token=gIkuvaN&text=help
FastAPI supports decoding of these parameters via the Form module, but needs an additional python library.
$ pip install python-multipartTo react to the slash command with our Python script we have to create a new function slack_slash and a matching decorator @app.post("/acibot"), filled with some life in the form of a help function.
And to round off the whole thing in terms of security, we also check the verification token that we noted when setting up the Slack App.
from fastapi import FastAPI, Form SLACK_VERIFICATION_TOKEN = "OnLmGpOwclDyXMNuNSRI5HAQ" app = FastAPI() @app.get("/")
def root(): return {"message": "API Server seems to be up"} @app.post("/acibot")
def slack_slash(text: str = Form("missing argument", max_length=20), token: str = Form(...)): if not token == SLACK_VERIFICATION_TOKEN: result = { "text": "ERROR: Wrong SLACK_VERIFICATION_TOKEN in request!" } return result if text == "help": result = { "response_type": "in_channel", "text": """Hi there! I accept the following commands: `/aci health` - show total system health """ } else: result = { "text": "_" + text + "_? I don't know what you're talking about. Please visit `/aci help`" } return result
The if conditionals are pretty straight forward, but a few words on the Form module provided by FastAPI. It enables a very granular definition of the permitted input parameters, which is essential for the operation of a robust API. That way I defined text to be a string with a max length of 20 characters and a default value of “missing argument”. The (verification) token has no default value due to the Python ellipsis ... placeholder, which makes it a required parameter.

Cisco ACI Integration
After all the prep, this is actually the easiest part. I simply reached into the shelf full of ready Python scripts and took over three existing functions for interacting with ACI using the requests library. Namely apic_login, apic_query and apic_logout. The finished work is available as a gist. Here is only the central excerpt of the slack_slash function.
@app.post("/acibot")
def slack_slash(text: str = Form("missing argument", max_length=20), token: str = Form(...)):
<snip> elif text == "health": apic_cookie = apic_login(apic=APIC_URL, username=APIC_USERNAME, password=APIC_PASSWORD) response = apic_query(apic=APIC_URL, path='/api/class/fabricHealthTotal.json', cookie=apic_cookie) logout_response = apic_logout(apic=APIC_URL, cookie=apic_cookie) response_json = json.loads(response.text) fab_health_total = response_json['imdata'][0]['fabricHealthTotal']['attributes']['cur'] result = { "response_type": "in_channel", "text": "Total System Health: " + fab_health_total } else: result = { "text": "_" + text + "_? I don't know what you're talking about. Please visit `/aci help`" } return result
If we call the acibot with the health argument, the script now logs into the sandbox APIC, queries the fabricHealthTotal class and parses the JSON response to only return the actual health score of the fabric.

Closing
That’s enough for an introductory post on how to use a REST-API as a chatbot. It is not too difficult to add further commands and perhaps extend the scope to classic network devices with CLI access (Nornir, Scrapli and the likes). Only a few more thoughts at the end.
Slack
Slack has deprecated the Validation Token and might turn off support. But I really wanted to show this form of authentication because it is still used by many other collaboration solutions. The successor is called signed secrets. Also, the direct response to a slash command request via return result is limited to three seconds with Slack. If your script needs more time to process (like scraping hundreds of network devices via CLI) you need to answer via a message response for instance.
Use Gunicorn In Production
If you want to go crazy and use a chatbot based on FastAPI in production, you need to take a look at Gunicorn to run your backend server with multiple workers and as a Linux service. Although, in that case a container-based deployment also has its charm. Anyway, if you’re providing an internal API only and want to bring your own certificates, Gunicorn can handle that as well and you could possibly do without a reverse proxy.
Housekeeping
I have left important credentials in the code for the sake of simplicity, but this is not a good style and should be replaced by environment variables or external (encrypted) files/vaults in production!
In case your FastAPI / development box cannot be reached via the Internet, ngrok or Mysocket.io comes in handy to safely publish a private API endpoint.
And now I hope that I have succeeded in sparking a real firework of ideas regarding possible use cases for this API integration and I’m already looking forward to your feedback. #chatops for the win!